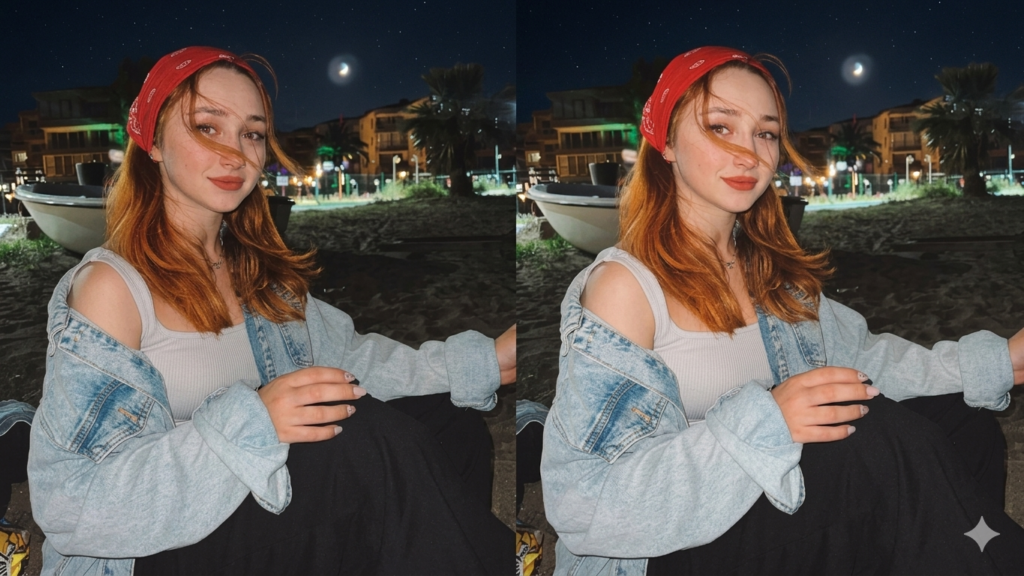
Overexposed photos can ruin even a great moment. The picture looks too bright, and important details start to fade away. Colors lose their depth, and the image looks washed out and flat instead of clear and natural.
This problem happens when the camera takes in too much light. Strong sunlight, bright lamps, or wrong settings can all cause it. Even in auto mode, your phone camera may fail to balance the light properly in some situations.
The result is a photo where skies turn white, faces lose detail, and bright areas look completely empty. It feels frustrating, especially when you thought the photo would be perfect.
Have you ever checked a photo and felt disappointed because it looked way brighter than what you actually saw?
What Is an Overexposed Photo?
An overexposed photo is an image that has too much brightness. This happens when the camera captures more light than needed. Bright areas lose detail, colors look faded, and the photo may appear white in some parts.
You may notice:
- White skies with no cloud detail
- Faces looking too bright
- Bright backgrounds hiding objects
- Weak colors and low depth
This problem can happen on both professional cameras and smartphones.Have you ever taken a photo outside that looked perfect in real life but too bright on your screen? That is overexposure.
What Causes Overexposed Photos?
Overexposed photos happen when your camera captures more light than needed. This makes the image look too bright and removes natural details.
Too Much Light
- Bright sunlight can wash out your photo
- Strong indoor lights can also over-brighten the image
- Reflections from walls, water, or glass can increase brightness
Wrong Camera Settings
- High exposure settings make the photo too bright
- Slow shutter speed can let in extra light
- Incorrect ISO settings can also increase brightness
Phone Camera Auto Mode Issues
- Auto mode may guess the light level wrong
- It can over-brighten scenes in sunlight or mixed lighting
- Fast lighting changes can confuse the camera
How to Fix Overexposed Photos ?
1. Lower Exposure
- Reduce brightness slowly and step by step
- Watch details return in the image
- Avoid making the photo too dark
- Adjust until light looks balanced
2. Reduce Highlights
- Lower the brightest parts of the photo
- Bring back details in sky and skin
- Fix washed-out white areas
- Stop when bright spots look natural
3. Adjust Whites and Contrast
- Reduce whites to control strong light
- Increase contrast for better depth
- Make sure colors stay natural
- Avoid making the image too harsh
4. Fix Shadows
- Lightly increase shadow brightness
- Recover details in dark areas
- Keep balance between light and dark
- Do not make the photo look flat
Tip: Make small changes and check your photo often for a natural result.
Advanced Fix (Easy Tools):
1. Mobile Apps
- Lightroom Mobile helps you control light and color easily
- Snapseed is simple and good for quick fixes
- Google Photos editor gives basic brightness and contrast tools
- All apps work well on most phones
2. One-Tap Fixes
- Auto-adjust tools fix exposure in one click
- HDR mode balances light and dark areas
- Some apps automatically recover lost details
- Great for beginners who want fast results
Example: Snapseed “Tune Image” can quickly fix brightness and bring back lost details in just a few seconds.
How to Avoid Overexposed Photos ?
1. Fix Camera Settings
- Lower exposure before taking the photo
- Check brightness on your screen
- Adjust settings in strong light conditions
- Take a test shot before final photo
2. Use Better Lighting
- Shoot in soft natural light or shade
- Avoid direct strong sunlight
- Use indoor light that is not too bright
- Position your subject away from harsh light
3. Tap Focus on Phone Screen
- Tap on the main subject on your screen
- Let the phone adjust brightness automatically
- Move exposure slider if available
- Lock focus for better control
Example: Tap on the face in your phone camera before clicking. This helps balance the light and keeps the photo clear and natural.
Tips for Better Photos :
1. Take Multiple Shots
- Click more than one photo
- Try different angles
- Choose the best result later
- This reduces mistakes
2. Check Preview Before Saving
- Look at the photo after clicking
- Check brightness and clarity
- Retake if something looks wrong
- Save only the best shot
3. Use Natural Light
- Shoot in soft daylight
- Avoid harsh sunlight
- Natural light gives better colors
- Helps avoid overexposure
4. Clean Camera Lens
- Wipe your lens before taking photos
- Use a soft cloth
- Remove dust and fingerprints
- Clear lens gives sharp images
Conclusion
Overexposed photos are a common problem, and they can happen to anyone while taking pictures. The good news is that most of these photos can be improved with simple editing steps like adjusting exposure, highlights, and brightness. A
long with editing, using good lighting and correct camera settings can help prevent this issue in the first place. With a little practice, you can easily take clearer and more balanced photos.
FAQS
Can all overexposed photos be fixed?
No. Only photos with some hidden details can be repaired through editing.
Which app is best for beginners?
Snapseed is one of the best beginner-friendly apps because it is simple and free.
Why do phone cameras overexpose images?
Phone cameras use auto settings and sometimes misread strong or uneven light.
Is HDR helpful?
Yes. HDR balances bright and dark areas and helps reduce overexposure.
How can I avoid it while shooting?
Use soft light, avoid harsh sunlight, and lower exposure before taking the photo.
Can Lightroom fix overexposed photos?
Yes. Lightroom has tools like exposure and highlights adjustment to improve bright photos.
Does sunlight cause overexposure?
Yes. Direct strong sunlight is one of the most common causes of overexposed images.
Should I use flash in bright light?
Usually no. Flash in bright light can make the image even more overexposed.