A scratched motorcycle tank can quickly make a beautiful bike look old, dull, and poorly maintained. Even small marks can stand out and ruin the clean shine that motorcycle owners love to see. These scratches often happen during daily use from keys, jackets, dust, or small parking accidents. The good news is that many tank scratches are easier to fix than most riders think.
With the right tools and simple methods, you can restore your bike’s smooth and glossy look at home without spending too much money. In this guide, you will learn how to identify different types of scratches, repair them step by step, and protect your motorcycle tank from future damage.
Have you ever noticed a scratch right after washing your bike?
Understanding Motorcycle Tank Scratches
Motorcycle tank scratches can look small at first, but they can affect the overall appearance of your bike. Understanding the type of scratch helps you choose the correct repair method and avoid extra damage during the fixing process.
Light Surface Scratches
Light surface scratches are the most common type of motorcycle tank damage. These scratches only affect the clear coat, which is the transparent protective layer above the paint. They are usually thin and only visible under sunlight or bright light. Most riders notice them after washing or cleaning their motorcycle.
The good thing is that light scratches are usually easy to repair at home. In many cases, a scratch remover, polishing compound, or microfiber cloth is enough to restore the tank’s shine. These scratches do not damage the actual paint layer, so the repair process is simple and affordable.
Example:
- Small swirl marks after cleaning the bike
- Light marks caused by dust during washing
- Tiny scratches from jackets or gloves
Medium Scratches
Medium scratches go deeper into the paint layer and are more visible than surface scratches. These scratches cannot always be removed with basic polishing because part of the paint has already been damaged. Motorcycle owners often need touch-up paint or polishing compounds to fix them properly.
If medium scratches are ignored, they can make the motorcycle tank look dull and uneven. Over time, dirt and moisture may collect inside the damaged area, making the scratch more noticeable. Repairing these scratches early helps maintain the clean and glossy look of the bike.
Signs of Medium Scratches:
- Scratch feels rough when touched
- Paint color looks faded around the damaged area
- Scratch remains visible after washing
- The mark looks deeper under bright light
Deep Scratches
Deep scratches are the most serious type of motorcycle tank damage because they cut through the paint and expose the metal underneath. These scratches usually happen after falls, accidents, or hard impacts. They are easy to notice and can make the motorcycle look badly damaged.
Deep scratches need quick attention because exposed metal can start developing rust after contact with air and moisture. These repairs may require sanding, primer, paint, and clear coat to restore the tank properly. In some cases, professional repair may also be necessary for the best results.
Signs of Deep Scratches:
- Bare metal is visible on the tank
- The scratch looks very deep and sharp
- Rust starts forming around the damaged area
- Paint is completely removed in some spots
- The surface feels uneven and damaged
Tools and Materials You May Need
Cleaning Supplies
- Microfiber cloth for soft and safe cleaning
- Mild soap for gentle washing of the tank
- Water bucket for rinsing dirt and dust
Scratch Repair Products
- Scratch remover for light scratches
- Polishing compound for smooth finishing
- Touch-up paint for deeper paint damage
- Clear coat spray for final shine and protection
Helpful Tools
- Sandpaper for smoothing deep scratches
- Foam applicator pads for even product use
- Polishing machine (optional) for faster results
Step-by-Step Guide to Fix Light Scratches
Step 1: Wash the Tank Properly
- Remove dust and dirt using mild soap and clean water
- Rinse the tank properly to clear all residue
- Dry the surface fully with a microfiber cloth
- Make sure no moisture is left before starting repair
Step 2: Apply Scratch Remover
- Take a small amount on a soft microfiber cloth
- Apply it directly on the scratched area
- Rub gently in circular motion for even spread
- Work slowly to avoid extra marks
Step 3: Buff the Area
- Wipe off extra product using a clean cloth
- Check the scratch under bright light
- Repeat lightly if needed
- Ensure the surface looks smooth
Example
- Like gently polishing a phone screen to restore shine
Step 4: Final Check
- Inspect the area carefully from different angles
- Confirm the scratch is reduced or gone
- Clean the area one last time
- Let the surface settle for a few minutes
Pro Tip
- Use a clean microfiber cloth for best results
- Work in soft natural light for better visibility
How to Fix Medium Scratches
Step 1: Clean the Surface
- Wash the tank properly before repair
- Remove all dust and oil
- Dry the surface completely
- Check scratch visibility under light
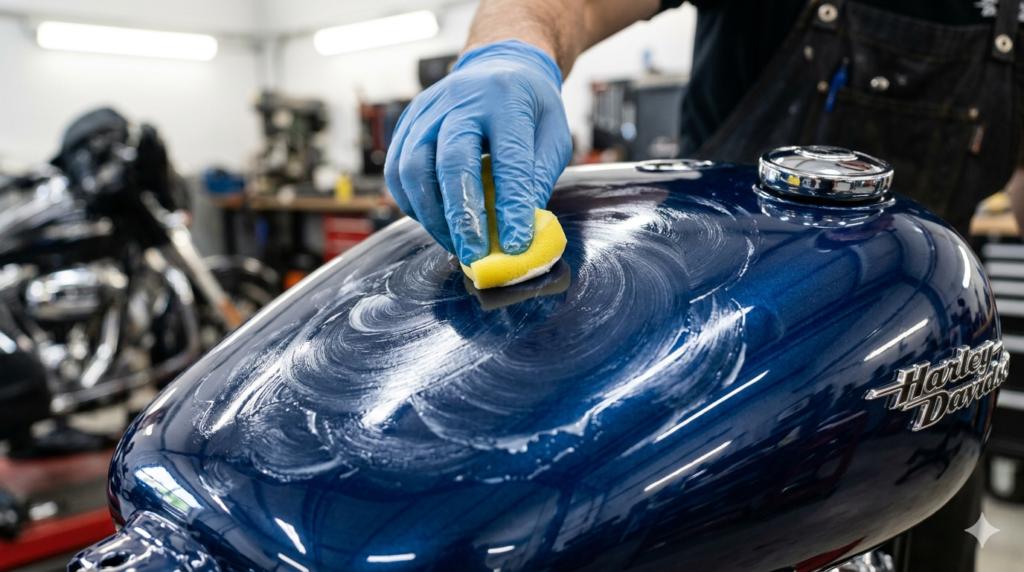
Step 2: Use Polishing Compound
- Apply a small amount on the scratched area
- Rub slowly in circular motion
- Work evenly across the surface
- Avoid overuse of product
Step 3: Add Touch-Up Paint
- Match the original bike paint color carefully
- Apply thin and even layers
- Let each layer dry properly
- Repeat if deeper area is visible
Step 4: Apply Clear Coat
- Spray or apply clear coat evenly
- Cover the repaired area fully
- Let it dry without touching
- Restore shine and protection
Important Tip
- Let each layer dry fully before next step
- Work in a dust-free area
How to Repair Deep Scratches
Step 1: Sand the Area
- Use fine sandpaper gently on damaged area
- Smooth rough edges carefully
- Do not over-sand the surface
- Clean dust after sanding
Step 2: Apply Primer
- Apply primer evenly on sanded area
- Create a strong base for paint
- Let it dry fully
- Check smoothness before painting
Step 3: Paint the Tank
- Use matching motorcycle paint
- Apply in thin and even coats
- Avoid heavy application
- Let each coat dry properly
Step 4: Finish With Clear Coat
- Apply clear coat for protection
- Give a glossy final finish
- Seal the paint properly
- Let it cure before use
Safety Tip
- Wear gloves to protect hands from chemicals
- Work in a clean and open area
Common Mistakes to Avoid
- Using rough cloths can create more scratches on the motorcycle tank surface
- Applying too much product makes the finish uneven and messy
- Skipping proper cleaning allows dirt to damage the paint during repair
- Rushing the drying process can cause paint to peel or look uneven later
DIY Repair vs Professional Repair
When DIY Repair Is Enough
- Small and light scratches on the tank
- Minor paint damage that has not gone deep
- Surface marks that can be fixed with polish or scratch remover
- Simple issues that do not expose metal or cause rust
When You Should Visit a Professional
- Deep dents on the motorcycle tank
- Large or wide scratches that cover a big area
- Rust problems or exposed metal surface
- Damage that needs repainting or expert tools
Example
- A deep scratch after a bike fall usually needs professional repair to restore proper paint and finish
Tips to Prevent Motorcycle Tank Scratches
- Use a tank pad to protect paint from zippers and keys
- Wash the bike correctly using clean microfiber cloths
- Avoid dirty covers because dust can scratch the paint
- Park carefully and keep distance from walls and other vehicles
Best Products for Motorcycle Tank Scratch Repair
- Scratch removers are beginner-friendly and fix light scratches
- Touch-up paint kits are used for medium paint damage
- Ceramic coating products help protect the tank for longer time
Conclusion
Small scratches are a normal part of motorcycle use, and every rider faces them at some point. The good news is that most light scratches are easy to fix at home with simple tools and a little care. When you understand the scratch type and act early, you can protect your bike from bigger damage and keep it looking fresh and clean for a long time.
Try to repair scratches as soon as you notice them. This helps prevent deeper damage, rust, and costly repairs later. Regular cleaning and proper bike care also keep your motorcycle tank in good condition and maintain its shine.So, take care of your bike like it takes care of your ride every day.
What type of scratch does your motorcycle have right now?
FAQS
Can toothpaste remove motorcycle scratches?
Toothpaste can reduce very light surface scratches. It works like a mild polish. It will not fix deep or medium scratches.
How do I know if a scratch is deep?
A scratch is deep if you can see metal or feel a rough cut with your finger. It often looks sharp and clearly visible.
Can I fix scratches without repainting?
Yes, you can fix light scratches without repainting. Medium or deep scratches usually need paint or touch-up work.
How long does scratch repair take?
Light scratches can take 10–30 minutes. Medium or deep scratches may take a few hours or even a full day.
Is touch-up paint worth using?
Yes, touch-up paint is very useful for covering paint damage. It helps restore color and improves the bike’s look.
Will polishing remove all scratches?
No, polishing only removes light scratches. Deep scratches need sanding, paint, or professional repair.
Can scratches cause rust?
Yes, deep scratches that reach metal can cause rust if they are not repaired quickly.
Should I repair scratches immediately?
Yes, early repair is always better. It prevents damage from getting worse and keeps your bike looking clean.